


Thumbs.db is a hidden file database that gets automatically created while the user is using thumbnail previews for folders in File Explorer. Thumbs.db though are no harm to you, but they can sometimes be responsible for creating some of the other minor issues in your system.
Today in this article, we are going to explain to you the method of Delete Network Folder with thumbs.db on Windows 10. The process isn’t difficult, but make sure you stay with us till the end to avoid any mistakes. Have a look:
Table of Contents
Different Methods to Delete network folder with thumbs.db using File Explorer
For deleting the Network folder with thumbs.db using File Explorer, follow the steps given below:
- Firstly, launch File Explorer on Windows 10 and navigate to the folder you want to Delete.
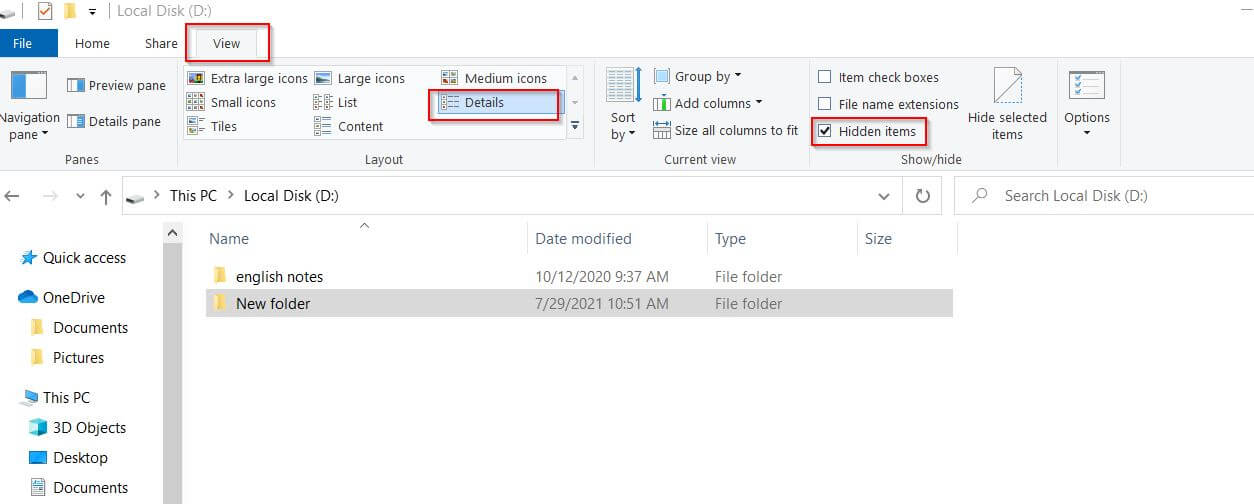
- Now navigate to the View tab (from the horizontal menu), tick the checkbox for the option Hidden items, and then click on the option Details under the Layout section.
- Further select the thumbs.db file, and then from the View tab, click on the Delete option.
- Lastly, click on Yes to confirm.
It will eventually remove the Network folder with thumbs.db on your Operating System. However, if it does not help, then switch to another view and choose the Details views again.
For deleting network folder with thumbs.db by disabling preview cashing:
- First, go to the desktop search bar, type gpedit, and launch the Local Group Policy Editor window from the search result.
- Now from the left-pane menu, click on User Configuration and then navigate to the following path,
Administrative Templates to Windows Components then move to File Explorer option.
- Further double-click over the Turn off the caching of thumbnails in hidden thumbs.db files policy and then click on the radio button for the option Enabled.
- Lastly, click on Apply -> OK and then restart your computer.
Once you are done, you will be able to delete network folders with thumbs.db files.
For disabling thumbs.db with Registry
- Firstly, go to the Windows search bar, type regedit, and launch the Registry Editor window with administrator access from the search results.
- Now navigate to the following path,
HKEY_CURRENT_USER\Software\Policies\Microsoft\Windows
- Further on the left-pane menu, right-click over the Windows folder, and then from the sub-menu, select New -> Key.
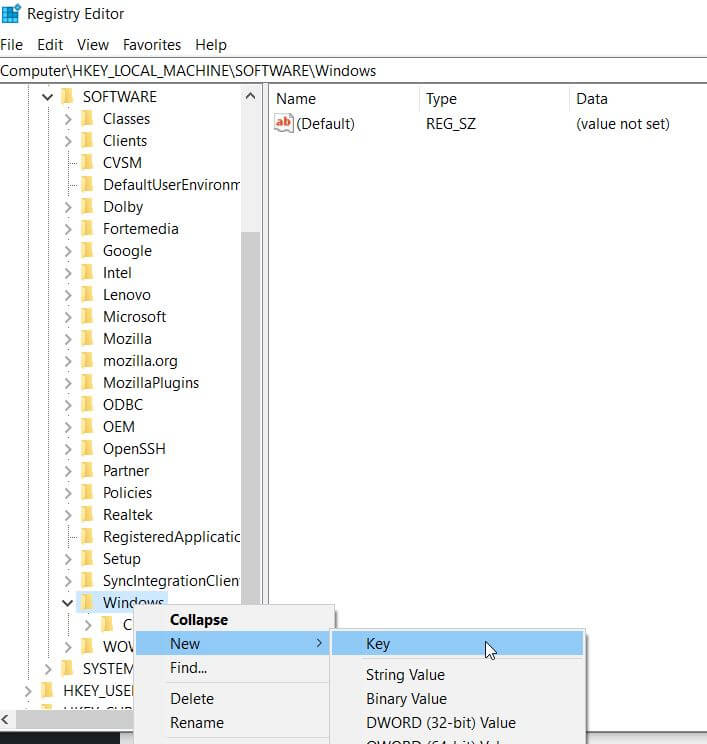
- Now name the Key Explorer, press Enter and right-click over the newly created Key.
- Select New -> DWORD (32-bit) Value, here name the DWORD as DisableThumbsDBOnNetworkFolders, and then press Enter key on your keyboard.
- Now double-click over the newly created DWORD and then change its value from 0 to 1
- Further, click on OK and then restart your computer.
Lastly, once the new settings will get applied, you will now be able to delete thumbs.db files without receiving the message “The action can’t be completed because the file is open in Windows Explorer.”
This is how you can erase the Network folder with thumbs.db on your Windows 10 Operating system. It has worked for a lot of users, and we hope that it will work for you as well.
At the end of this article, we hope that the above information will prove helpful and relevant for you. It you have any queries or doubts after reading this article, please leave a comment in the below comment box.